0:05
hi everyone inat kler here with a new
0:08
video tutorial and I have some news for
0:18
you I can't believe it the 12 cards of
0:24
celebrating its 10th anniversary and
0:27
we're celebrating together with you with
0:30
a never seen before amazing giveaway
0:33
this ultimate giveaway will have 12
0:36
different winners each of them will
0:39
choose their own prize Yes you heard me
0:42
so check out all the details how to join
0:47
below that is pretty exciting so welcome
0:51
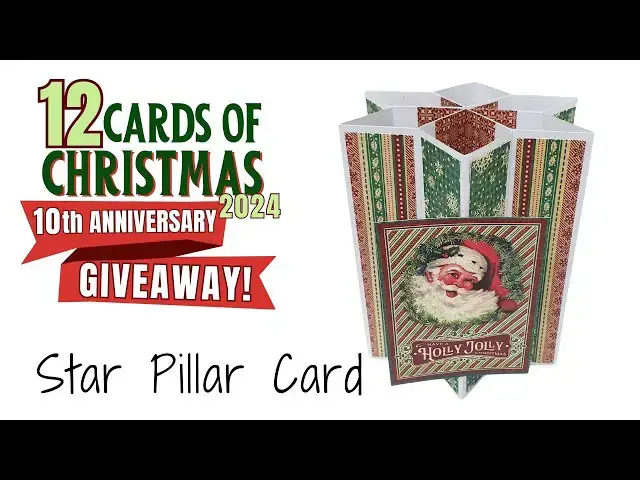
to the 12 cards of Christmas Series
0:53
today we're making the star pillar card
0:56
and you have a link to the measurements
0:57
in the description under the video so
0:59
you can go ahead and precut all your
1:01
pieces so you can make the card so we
1:04
have two pieces for this card we are
1:06
going to start with the smaller
1:09
piece and the smaller piece is basically
1:12
we're going to cut it from a 12 x 12
1:15
piece of paper so we're going to to
1:18
score the smaller piece on the short
1:21
side at 1 and 1/2 3 and 4 and
1:27
1/2 so we're going to score the smaller
1:30
piece on the short side at 1 and 1/2 3
1:36
1/2 and then we're going to bring the
1:40
piece and score it at 1 and
1:43
1/2 3 4 and 1/2 7 and 1/2 9 and 10 and
1:51
1/2 so again the second larger piece
1:54
we're going to score it at 1 and 1/2 3 4
1:58
and 1/2 7 and 1/2 9 and 10 and
2:02
1/2 so these are all the score lines
2:06
making it's going to make sense in a
2:12
promise just going to finish with all
2:19
scoring and then we'll be able to
2:25
continue so once we have all our score
2:28
lines we're going to to cut our larger
2:32
piece into four equal squares cut them
2:37
out into four equal squares again you
2:40
have all the measurements in the
2:42
description under the
2:47
video and then we also going to cut the
2:51
smaller piece that we scored into two
2:56
squares so all together we have six
3:02
squares so now we can go ahead and
3:11
squares and then we are going to
3:23
half so we have six of those we're going
3:27
to score them in half
3:33
so basically these are going to connect
3:36
the inside of our star
3:39
pillar so they have a double duty they
3:42
are cover papers and they're
3:46
connecting and giving the card a nice
3:49
look so now you can fold on all the
3:52
score lines you fold all the score lines
3:55
in the same direction each of your
3:58
squares will have four panels like
4:02
this so next we are going to apply glue
4:06
on the right side panel
4:12
only and then attach take another square
4:17
fold and attach so we fold the left
4:26
to the first one again we're going to
4:30
apply glue on the right
4:33
panel bringing another
4:42
attach so repeat this with all make sure
4:46
everything is aligned and you repeat
4:48
this with all the squares until you have
4:54
paper so you apply glue on the right
4:57
panel bringing another
5:00
Square fold the left panel and
5:03
attach making sure it is completely
5:08
aligned and we keep on going until we
5:11
have attached all the pieces and this is
5:18
have this is how it looks now we're
5:23
fold these cover paper pieces the one
5:31
and when you fold them make sure that
5:34
the pattern you want to show is on the
5:45
this and I always burnish my folds with
5:52
folder so it will look nice and
5:55
crisp okay so now we can start assemble
5:58
our star pillar so what we're going to
6:02
do is start on the right side going to
6:08
Square take our cover
6:13
glue to one side of the folded cover
6:20
folded and then we're going to align the
6:23
fold with the edge of the paper and
6:34
good just make sure it is completely
6:37
aligned then we're going to apply glue
6:39
on the other side of the folded cover
6:44
paper and close the white paper on it
6:49
like this fold it in half and close
6:53
it so this is our first pillar in the
7:01
now let's do it again we're going to
7:04
square apply glue to one side of the
7:11
paper align the fold line the folded
7:15
side with the edge of the white paper
7:22
perfectly and now we're going to apply
7:25
glue on the other side of the folded
7:27
cover paper cose close the white paper
7:33
attach we're going to repeat this on all
7:37
the sides and this will create our
7:45
open the paper apply glue again on the
7:51
paper align the fold with the edge of
7:57
paper align it with the edge
8:00
Edge and then apply glue to the other
8:03
side of the folded cover
8:05
paper close the white card stock in half
8:12
attach and this way we are building our
8:15
star pillar section by section so each
8:18
time we add another section so we
8:21
open you already know what to do apply
8:24
the glue align the folded side with with
8:32
edge and then apply glue to the other
8:37
paper close the card stock in half to
8:44
attach so by now you should already
8:49
have almost all the pillars
8:55
ready so let's make another one I apply
8:58
the glue align it the fold with the edge
9:03
paper apply glue to the other side and
9:07
then close the card stock in half to
9:13
attach so now we have one
9:19
more and then you'll see how pretty that
9:25
looks so we repeat the process here as
9:28
well we align the fold with the edge of
9:34
paper and then close the card stock in
9:42
attach and this is how it looks so far
9:45
so now all we need to do is attach the
9:48
both sides of the star like this with
9:52
glue you see how the cover paper all the
9:55
cover papers look pretty inside so what
9:57
I like to do is to just flatten
10:01
it and then apply glue to the two panels
10:06
or one panel that is supposed to be
10:09
attached make sure not to get confused
10:12
stage so apply glue to one of them and
10:16
then flatten it to attach and now your
10:21
star pillar is basically ready like to
10:24
just flatten all the sides to make sure
10:27
everything is completely
10:29
leveled and this is by the way how you
10:32
can insert it into an envelope if you
10:34
want you can flatten it so this is your
10:36
star pillar now let's add the front
10:47
little things that are going to hold the
10:51
front panel the little
10:53
tabs you're going to fold them in
10:56
half and then attach them to the the
10:59
front so you apply glue to one
11:03
side and then attach it to the front of
11:07
one of the star pillars aligning it with
11:11
the fold with the front fold and then
11:14
you'll do the exact same thing with the
11:15
other side attaching it from the other
11:19
side of the fold like
11:23
this and then these two folded pieces
11:26
are going to hold the front pan
11:30
just make sure that they're
11:33
straight see we can attach a front panel
11:37
to them they will hold it when we open
11:39
the card cuz they're going to stand like
11:44
that okay so now it is time to cover
11:49
our pillar our star pillar and add our
11:58
card so I played with two patterns of
12:01
course you can decide however you want
12:05
to embellish your star
12:13
completely I just thought it will be fun
12:16
to play with two patterns make it a
12:20
interesting so each side of my star
12:25
has alternating patterns and colors
12:29
so they go in pairs again you have all
12:33
measurements in the descript in the link
12:35
in the description under the video so
12:37
you can go ahead and download it so this
12:40
is how it looks when the all sides are
12:42
covered now I only have to add my front
12:47
panel please don't forget to subscribe
12:49
to my channel and click on the little
12:52
bell icon to be notified when to upload
12:53
a new video so you won't miss anything
12:55
and you'll be able to follow all the
12:58
tutorials in make all the
13:00
cards don't forget to join our amazing
13:04
giveaway you have all the details in the
13:07
description under the video how to join
13:09
the giveaway and how to increase your
13:12
chances of winning by a
13:14
lot so don't forget to check that
13:17
out so this is the finished card I
13:20
really like how this turned out it looks
13:22
really pretty when it's stands and you
13:23
can flatten it to put it inside an
13:26
envelope really hope you like this one
13:29
thank you very much for joining me and I
13:31
will see you next time