live_tv
Livestream Starting Soon
00
Hours
:
00
Minutes
:
00
Seconds
Up next in 10

Get the measurements for the gatefold cards: https://mailchi.mp/8986da7726d2/gatefold-cards
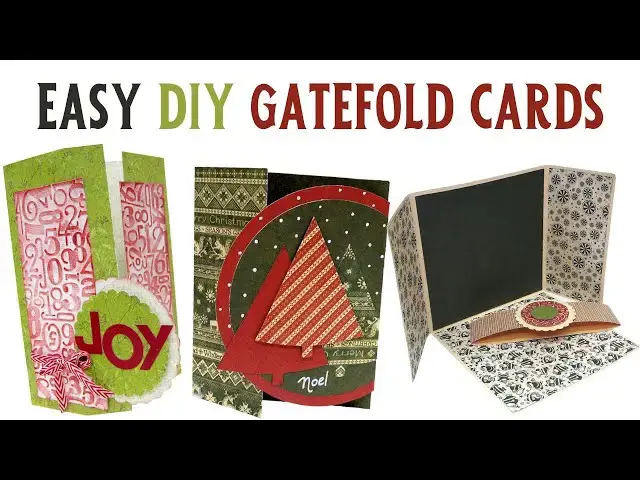
Learn how to make 3 different gatefold card designs. Easy handmade cards that are perfect for any occasion or event.
Become a member of this channel and get the complete GATEFOLD CARDS EBOOK:
https://www.youtube.com/channel/UCPdD0ifkS1vKYPs3zgDx3YQ/join
Show More Show Less View Video Transcript
0:01
[Music]
0:09
hi everyone an Kesler here with a new
0:11
video tutorial and today I'm going to
0:13
show you how to make three different
0:15
gatefold cards you have a link to the
0:17
measurements in the description under
0:19
the video for all the three cards so
0:22
I've started with a white paper that I
0:25
have embossed in my diecutting machine
0:28
but you can just use use a regular
0:31
pattern paper this is going to be my
0:33
cover paper so I'm just applying a
0:35
little bit of distress ink to highlight
0:38
the raised parts of the embossed pattern
0:41
again this is just uh my design idea but
0:45
you can of course use just regular
0:47
pattern paper then you have your card
0:50
base we're going to score it at 3 and8
0:54
in to create our gate
0:58
fold basically a gate fold is a card
1:02
where both sides are forward folded
1:06
inward to resemble a gate that opens
1:11
like a big door on both sides and now we
1:13
are going to learn all types of design
1:16
to make them so I have folded both score
1:23
lines to create my gate
1:27
fold and I'm just going to add my cover
1:29
paper papers just going to do it in a
1:32
little bit of a different
1:35
way there is a fold there that should
1:38
not be it should be ignored just the 3
1:42
and 8 in like I told you so I'm going to
1:46
bring my cover
1:49
papers I'm going to cut this in half you
1:51
have all the measurements and then I'm
1:54
going to attach them to the front of my
1:57
card I've also punched two circles again
2:02
you can use any type of embellishment
2:05
that you
2:07
want for the card what I wanted to do is
2:14
simply combine the circles with the
2:17
cover paper so I'm going to show you
2:21
how so this one is going to go on the
2:24
top and this one is going to go slightly
2:26
underneath it like this
2:30
just going to add a little bit more of
2:32
distress
2:37
ink and then what I'm going to do is
2:40
first always distress the edges but
2:43
first i'm going to attach the large
2:46
circle to the left part of
2:50
my
2:52
card I want it to stick out to the side
2:57
like this
3:02
and then it will be like a little handle
3:04
to open and close the card and then I'm
3:07
going to attach my cover
3:10
paper and then on top of that I'm going
3:12
to attach my other circle with some foam
3:16
tape just to give it a little bit of
3:20
Dimension you can do the you can skip
3:23
this part completely and do the entire
3:25
embellishment of the card
3:28
differently so
3:31
of course it's up to you just going
3:34
to put that under there
3:41
forgot just going to make sure that it
3:45
fits and then attach
3:48
it first I just want to add a little
3:51
ribbon around
3:55
it and then I think my card will be done
3:59
you have all kinds of ideas
4:02
for embellishing get fold cards you can
4:06
just leave it
4:08
plain you can add so many other
4:14
ideas this is one of
4:17
them so I'm just attaching the
4:22
piece and then tying the ribbon
4:25
around the cover paper
4:31
and then I'll be able to attach the
4:33
other cover paper and add my title or my
4:36
word I think I'll add
4:38
Joy but of course you can add any
4:42
sentiment or wording that you want with
4:45
stickers
4:47
handwriting
4:50
whatever you want this is basically this
4:53
is the basic gatefold card
5:00
a really easy design to make that can be
5:05
embellished in any
5:08
way so there's my little
5:13
bow and then I can go ahead and attach
5:16
the other
5:20
piece this will stick a little bit to
5:23
the
5:24
left and I want it to be aligned with
5:27
the piece on the right side
5:32
you can make it narrower you can make it
5:35
any way that you
5:36
want and then I'll just add some letter
5:39
stickers in the
5:42
front pretty
5:44
easy so this is the first card the first
5:47
gate fold
5:50
card and we can go
5:54
ahead and then I'll show you how to make
5:57
the second one hope you like this this
5:59
one this is a pretty basic
6:02
design so for the second card you need a
6:05
base card in the right dimensions as it
6:09
is written in the cutting guide don't
6:11
not on the video sorry about that and
6:14
two circles that you also have
6:15
measurements for that as
6:20
well and you need to score it on the 2
6:23
in line and fold
6:30
now apply your glue on the smaller
6:33
Circle and attach it to the larger
6:36
Circle centering it in the middle you
6:39
want nice and even margins all around
6:44
now we need to place the circle on the
6:49
card
6:52
slightly centering it from the top and
6:54
the bottom and slightly about 2 in
6:58
popping out
7:00
to the side and then simply mark it with
7:02
your
7:03
pencil and score because we want to fold
7:08
our
7:10
Circle so align your line and score it
7:15
with your scoring tool score pal or
7:19
whatever else you have in your stash and
7:22
then simply erase the pencil
7:25
Mark now fold it might be a little bit
7:29
difficult diffult because you have two
7:30
layers of card stock then burnish it
7:34
well with your bone
7:36
folder next you need to apply your glue
7:38
on the
7:40
inside of the fold only on the part the
7:45
little flap that you folded and attach
7:48
it to the bottom side of your
7:50
card and basically what we're creating
7:53
is a gate fold but instead of it being
7:57
square one side is square and the other
8:00
is a circle so I think that's really
8:03
cool and really easy make sure that when
8:06
you are attaching your circle you align
8:09
it to be exactly in the center between
8:12
the top and the bottom next Punch or cut
8:16
three Christmas trees from different
8:20
pattern card stock and attach
8:23
them to the front of your card
8:30
I want to arrange
8:32
them like
8:35
this and they will slightly overlap each
8:39
other because we want to create layers
8:42
so the two bottom trees are glued
8:45
directly on the front of the card and
8:50
the third tree I'm going to use 3D foam
8:53
tape to add a little bit of
8:57
Dimension and attach attach
9:00
it more or less in the
9:03
center so once you have all the trees
9:06
glued to the front of your card simply
9:08
trim whatever part that is sticking out
9:13
on the
9:15
sides now I'm taking a white Pusa pen
9:18
this is an oilbased
9:22
um marker you can use Sharpie or
9:26
whatever pen that you have that can that
9:29
is white and will be visible on top of
9:33
your card and I'm adding little
9:37
dots on the front of my card only on the
9:41
circle to create a type of snow and an
9:45
interesting
9:48
pattern sometimes with these white pens
9:51
you need to go over
9:54
the dot or whatever it is you drew to
9:58
make it really white white cuz sometimes
10:00
the paper
10:02
absorbs the liquid of the
10:05
ink so I'm just going over the the dot
10:09
that that are not white enough for me
10:12
and then finally I'm going to write Noel
10:14
you can do this with a sticker or a
10:19
stamp
10:20
whatever and of course you don't have to
10:23
write Noel you can write whatever word
10:26
that you want or even leave it empty
10:31
isn't that a really cool card so we're
10:35
going to I really hope you like this
10:36
card we're going to make our third card
10:39
and by the way I just wanted to say that
10:40
all these cards are in Christmas themes
10:43
but you can change the papers and the
10:45
embellishment and make them for anything
10:47
any occasion any event that you want so
10:51
for our third card is also going to be
10:53
pretty
10:55
easy we're going to start with our 12 by
10:58
12 paper
11:00
and we're going to score
11:02
it at 3
11:05
in 9
11:08
in and then turn it to the side and
11:13
score it at six this is all the scoring
11:16
that we need to
11:18
do next we are going to fold it just
11:22
going to turn it so you'll see how the
11:25
folds
11:27
look and there is no pattern it's easier
11:30
to see the fold
11:32
lines always use your bone folder to
11:35
burnish all the
11:39
folds so now what we need to do is take
11:42
our scissors and
11:43
cut along the fold line the vertical
11:48
fold line until the horizontal fold line
11:52
and remove
11:54
that piece that rectangle all together
11:58
and then we're going to do the same
12:00
thing on the other
12:02
side and basically this is the card very
12:05
easy and very quick to
12:09
make just remove that piece can use it
12:12
for other
12:16
things and then you fold the bottom
12:20
towards the
12:21
inside and then the two
12:25
sides closing in if you find that it's a
12:29
hard to close then you can remove
12:32
slightly more from that bottom Square to
12:35
make it easier to close now you can
12:38
bring all your cover papers and you
12:40
simply need to attach them to all sides
12:43
of the card decide what pattern you want
12:47
to be on the outside and what pattern
12:50
you want on the
12:53
inside so since I'm using
12:57
double-sided card stock that I can
12:59
choose what pattern I want on which
13:04
side some of them have patterns on both
13:07
sides and some of them have a solid
13:10
color on one side and a pattern on the
13:11
other side so I can play with
13:13
that and of course you can do that with
13:16
any paper that you have I'm using the
13:18
Graphic
13:19
45 papers from different Christmas
13:22
collections that I have in my
13:26
stash so I want solid color color to go
13:29
in the front and the pattern to go on
13:33
the
13:36
inside so I'm going to attach
13:40
that and basically this is the card so
13:44
once you add the papers it might be a
13:47
little difficult to
13:49
close cuz it's too
13:52
tight so you can simply remove very very
13:56
very little just cut it out with your
13:58
scissors
14:00
to make room for the paper to fold like
14:03
this now take your strip of
14:06
paper and wrap the card with it folding
14:09
it on both
14:11
sides this is going to be our closing
14:15
mechanism and then I punched out a few
14:18
circles that I'm going to attach
14:21
together with some foam
14:23
tape a little Dimension is always nicer
14:27
and looks nicer on a card
14:30
so I'm going to Center all circles one
14:32
on top of the
14:34
other and
14:36
then attach them according to their
14:43
size of course you can choose whatever
14:46
pattern paper embellishments that you
14:49
have and then I'm going to attach the
14:52
circle to both edges of my
14:57
strip and that will be
14:59
my closing mechanism which I can
15:03
open then open the
15:06
card and close so this was our last
15:11
gatefold card I really hope you like
15:13
this tutorial there is a complete
15:16
gatefold cards ebook that you have more
15:20
than 10 ideas to make gate full cards
15:24
but you only get it if you become a
15:26
member of this channel so click on the
15:28
join button and get your ebook thank you
15:31
very much for joining me and I will see
15:33
you next time
#Crafts
#Special Occasions
#Gifts & Special Event Items
#Greeting Cards
#Art & Craft Supplies
#Other
#Custom & Personalized Items