live_tv
Livestream Starting Soon
00
Hours
:
00
Minutes
:
00
Seconds
Up next in 10

Get the measurements and cutting guide: https://mailchi.mp/84d618dfd27b/a00xv5ribh
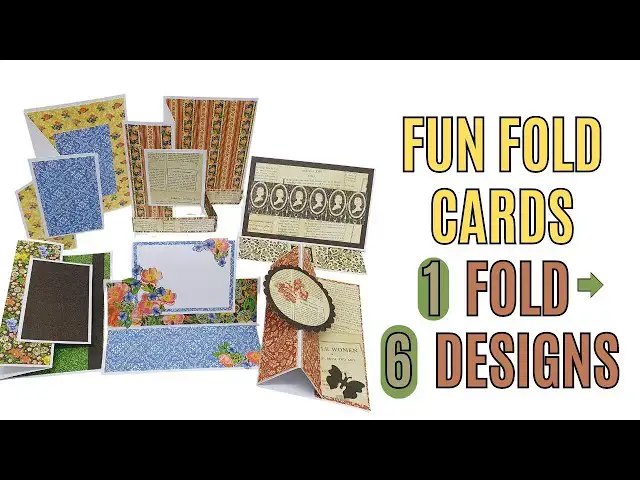
Make fun fold cards with the same fold but with 6 different designs. These easy handmade cards are a lot of fun to make!
Join this channel to get access to perks:
https://www.youtube.com/channel/UCPdD0ifkS1vKYPs3zgDx3YQ/join
Show More Show Less View Video Transcript
0:01
[Music]
0:07
hi everyone in at kler here with a new
0:08
video tutorial and today I'm going to
0:10
show you how to make one fold in six
0:15
different ways which means we're going
0:17
to create six different cards using the
0:20
same fold you have the measurements in
0:23
the link in the description under the
0:25
video you can go ahead and download it
0:28
so let's get started with our first
0:30
first card and the fold so you have all
0:32
the measurements in The Cutting guide
0:34
you can go ahead and download it and
0:37
what we're going to do is simply score
0:39
the paper at 2 and 4 in and then we
0:44
either fold it in an accordion shape or
0:47
fold
0:48
it in
0:51
a same
0:54
direction so we can go ahead and start
0:57
with the first card so the first first
1:00
card is pretty easy we're going to cover
1:03
it with cover papers again you have all
1:05
the measurements in The Cutting guide
1:07
that you can go ahead and download and
1:09
print so we're going to cover the front
1:14
panel and the inside of the card I'm
1:16
going to leave the second panel
1:17
uncovered but of course you can cover it
1:19
if you want you already have the
1:22
measurements then we're going to cover
1:24
our small front panel and we're going to
1:27
attach it to the card
1:31
just adding a little
1:33
stripe this is optional of
1:37
course now we're going to apply glue
1:39
only to the left side of this front
1:42
panel
1:43
here so it will be easy to open and
1:47
close and get that full effect of the
1:50
card we're going to center
1:54
it and you have your first card with the
1:58
funfold
2:00
this is the easiest
2:02
version card number two again we're
2:05
going to score at two and four this time
2:09
we're not going to fold it in accordion
2:11
shape but we're going to fold it in the
2:13
same direction and we're going to make
2:15
an easel
2:17
card so I'm going
2:20
to have
2:23
two cover papers for each of the
2:28
panels and then for the inside of the
2:31
card as
2:32
well of course you can play with the
2:35
cover papers whatever you have in your
2:37
stash whatever combinations you want to
2:41
make you can go ahead and do
2:47
that it's completely up to you in terms
2:50
of embellishments as well so the front
2:53
is
2:55
covered now the next part is to create a
2:59
stopper because this card is going to be
3:02
an easel card so these cover papers have
3:05
a dual job they cover the card and they
3:09
also create a
3:11
stopper we're going to attach this
3:13
aligning it to the right side of the
3:15
inside of the
3:18
card and then you
3:22
can punch your
3:25
circles if you don't have a circles it
3:27
will work with a square as well or a
3:30
heart or any shape that you
3:32
want and this is how it's going to be
3:34
folded so now let's attach our Circle or
3:39
front panel I'm applying glue only on
3:42
the fold on the fold line because I want
3:46
this to stand when I open the C like
3:48
this it has to be dry
3:52
first so only on the fold that's the
3:55
only place when you add your glue to
3:58
attach your front circle panel or other
4:03
shape and after it's
4:07
dry see this is how it stand this is the
4:11
easel card with the front panel which is
4:14
moving because it's not
4:16
dry so this was card number two card
4:19
number
4:20
three again it's going to be an easel
4:23
card so we are scoring our paper at two
4:27
and 4 Ines on the long side
4:30
and folding it in the same direction
4:32
this card is going to be
4:35
horizontal so
4:38
the technique is pretty much the same
4:41
we're going to cover the front panels of
4:44
the
4:48
card and then we're going to have a
4:50
stopper on the inside of the
4:54
card but this time we're going to
4:57
embellish the card with a rectangle
5:01
panel that is going to stand up when we
5:04
open the card so it's going to look
5:05
really
5:08
cool I've added some
5:12
flowers again you can use whatever you
5:15
have in your
5:15
[Music]
5:18
stash you can use
5:21
stickers whatever you have there so this
5:24
is our stopper we're going to again
5:28
attach it to the inside of the card
5:29
aligning it this time with the bottom so
5:32
when we close the card like this it will
5:35
stand let's finish embellishing this
5:39
smaller panel
5:43
here a little bit of fussy
5:49
cutting so this is going to go up here
5:52
so again apply glue only to the bottom
5:55
of the panel you don't want to stick all
5:57
of it just part of it or half of it and
6:00
then we attach it to the front panel
6:04
like this only to the
6:06
bottom front panel so when we open
6:11
it we'll
6:14
have a horizontal easel card Like This
6:19
Isn't that
6:21
cool so that was card number
6:27
three card number four
6:31
again we stay with the same
6:34
folding we're going to score the card at
6:37
2 and 4 in and again fold it in the same
6:41
direction this is a full easel card
6:44
because the panel is going to cover the
6:46
entire
6:48
front so first let's cover the inside of
6:51
the
6:53
card and then let's cover the panel so
6:56
you see that the panel has the same size
6:58
again you have have everything you need
7:00
in terms of measurements in The Cutting
7:03
guide that you can go ahead and
7:05
download so I'm just
7:08
covering the front panel with my cover
7:16
papers you can use whatever papers you
7:19
have in your
7:21
stash and don't forget we need a little
7:23
stopper so this one will go here we
7:27
don't need to cover the F the front
7:29
panels because they were all covered by
7:31
this large panel so we apply glue only
7:34
to the
7:35
bottom front panel and then
7:38
attach this large front panel to align
7:42
with the bottom and then you add your
7:45
little stopper on the
7:48
inside align it in the center and then
7:51
it will
7:52
stand so card number five again we score
7:56
it at 2 and 4
7:58
in
8:00
and fold it this time in a diag in a
8:05
accordion shape that means two different
8:07
directions one towards the inside and
8:10
one towards the
8:11
outside so now we're going to Mark
8:16
at 2 and 1/2 in on the left side and
8:19
then cut diagonally from the center to
8:23
that Mark that we made at 2 and 1/2
8:26
in so basically now we're going to make
8:28
a d diagonal fold or a diagonal card so
8:34
let's first cover the inside of the card
8:37
and then I'm going to show you how to
8:40
match
8:42
the cover papers for the diagonal part
8:47
so like we said
8:48
we marked at 2 and 1/2 in from the top
8:53
on the left side so now
8:56
simply align your cover paper
8:59
and then Mark the two sides of the
9:03
diagonal and simply cut it it's really
9:06
easy cut the line between the two points
9:09
that you marked with a
9:13
pencil and then your cover paper will
9:17
match perfectly I only cover this panel
9:21
if you want to cover the other panel you
9:23
just repeat the process with another
9:26
same size cover paper
9:30
so this aligns
9:35
perfectly now let's cover the front
9:39
panel that we're going to
9:43
add and then we're going to first attach
9:47
this panel again we apply glue only to
9:51
the part that we want to
9:54
attach and we're going to align it in
9:57
the center between all the edges
10:00
and then an extra piece on the inside of
10:02
the card to be exactly in the same
10:07
place they're going to align perfectly
10:09
so when you open the card you have
10:12
another panel on the inside you can
10:14
write something on of course depending
10:16
on the color that you the pattern that
10:18
you
10:20
use so this was card number
10:23
five card number
10:28
six
10:29
again we're going to score our page our
10:33
piece at 2 and 4 in and fold it in an
10:36
accordion shape that means one fold
10:39
toward the inside and one fold toward
10:41
the outside let's cover the inside of
10:44
our
10:48
card and then we are going to cover this
10:52
the
10:53
other
10:55
panels this time we're going to cover
10:58
both of them
11:01
we're going to have a front panel and
11:03
then another paper strip on the bottom
11:07
so I like really like this
11:09
design so first let's cover the
11:15
panel and then we need to score our
11:20
strip so we're going to score it at 4 in
11:26
and 6
11:27
in
11:31
and then we're going to fold it again in
11:33
an accordion shape to match the fold of
11:37
the card so at four and
11:43
six Let's Fold
11:47
it you can leave it like that but I like
11:50
to cover it with some cover papers so it
11:53
will match the design of the entire
11:56
card you can just leave it
12:00
if you
12:01
want uncovered if you're using pattern
12:04
paper like
12:12
me so now how we are attaching this
12:15
we're going to apply glue to the bottom
12:17
of the front panel and attach the strip
12:21
aligning it with the
12:24
corner then we're going to make sure
12:26
that the folds are in the right
12:28
direction
12:29
apply glue to the last part of the strip
12:33
and aligning it with the bottom right
12:36
corner this time so when we close it we
12:40
have a strip down there that looks
12:42
really pretty now let's apply glue only
12:45
to the side of the panel like we did
12:47
before attach it to the front panel of
12:50
the card aligning it with the
12:52
center and now we have card number six
12:55
ready Isn't that
12:57
cool
13:01
so these are our six cards that we made
13:04
isn't that pretty one fold six different
13:09
designs I think that's really cool now
13:13
if you want an extra tip if you want to
13:16
make two more cards with the same fold
13:20
popup cards with the same fold these are
13:22
going to be really easy to make two
13:26
more popup cards using the same fold
13:30
I'll show you the design this is
13:32
available for channel members so if you
13:35
want to join our Channel and become a
13:37
member and support me in creating more
13:39
videos for you then just click on the
13:41
join button and for $5 a month you get
13:45
extra tips extra tutorials and extra
13:48
projects so go ahead click on that join
13:51
button and join our membership if not
13:54
don't forget to subscribe to my channel
13:56
and click on the little bell icon to be
13:58
notif notified when I upload a new video
14:00
so you won't miss anything and you'll be
14:02
able to follow all the tutorials and
14:04
make all the projects so thank you very
14:07
much for joining me and I will see you
14:09
next
14:27
time
#Arts & Entertainment
#Online Media
#Crafts
#Greeting Cards