live_tv
Livestream Starting Soon
00
Hours
:
00
Minutes
:
00
Seconds
Up next in 10

Get the measurements: https://mailchi.mp/1207294d8b02/giftboxes
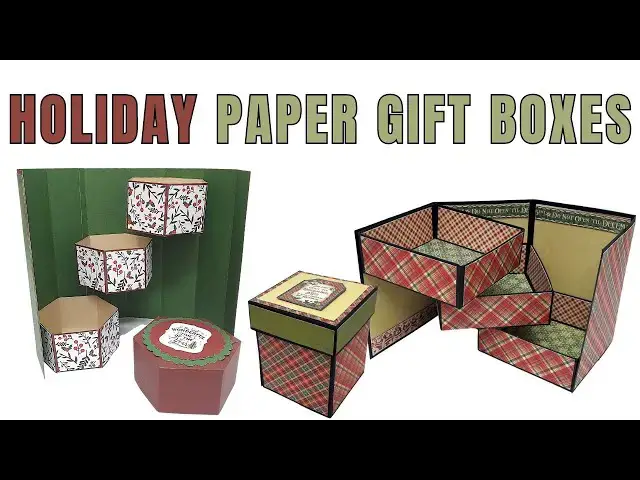
Learn how to make two different holiday paper gift box designs. With these unique DIY Christmas gift boxes your gift giving will make everyone say WOW!
#christmascrafts #christmasgifts #diygiftbox #papergiftbox #holidaygifts #papergiftideas
Join this channel to get access to perks:
https://www.youtube.com/channel/UCPdD0ifkS1vKYPs3zgDx3YQ/join
Show More Show Less View Video Transcript
0:01
[Music]
0:11
hi everyone Anette kler here with a new
0:13
video tutorial and today I'm going to
0:15
show you how to make a hexagon box which
0:19
is really really cool with little boxes
0:22
inside and you have as usual a cutting
0:25
guide with all the measurements for all
0:27
the pieces that you can download from
0:30
the link in the description under the
0:32
video so we're going to start with our
0:35
box
0:37
piece and we're going to score it at 1
0:40
and
0:41
7/8 3 and
0:43
3/4 5 and 5/8 7 and 1/2 9 and 38 and 11
0:51
and
0:52
1/4 a little bit
0:55
confusing but that's why you have
0:57
everything written down that you can
0:59
download and then you have it in front
1:00
of you and it's easier to follow
1:04
along so once we have scored all these
1:08
score
1:09
lines we're going to turn the papers and
1:12
on the short side the paper sorry and on
1:15
the short side score it at 2 in and this
1:19
is
1:20
basically the piece that we're going to
1:22
make the box from
1:25
and going to show you how so we're going
1:28
to fold all the score score lines the
1:30
vertical score
1:33
lines and then we're going to fold on
1:35
the horizontal score
1:38
line and I'll show you how to make the
1:41
little
1:47
box okay always burnish with your bone
1:51
folder now we have all those squares and
1:54
we're going to cut from the bottom on
1:58
that little
2:01
score line and cut on a diagonal to
2:04
create a little
2:06
tab this will close the
2:10
box and we're also going to cut along
2:13
the vertical score lines from the bottom
2:17
until the horizontal score line this
2:21
will allow us to create the bottom of
2:24
the box
2:30
and connect everything
2:33
together before you attach the Box we're
2:37
going to cover the sides with the cover
2:41
papers you have all the measurements for
2:44
that as well in The Cutting
2:53
guide you can play with the pattern with
2:56
the colors of your
2:58
papers and this
2:59
[Music]
3:01
decide how you want your box to
3:07
look we only need five cover
3:12
papers now we are ready to close the
3:15
box so we're going to apply glue on that
3:18
little tab on the
3:20
right and attach it to the end of the
3:24
paper like this just close
3:28
it now we're going to attach all the
3:32
pieces that we cut on the bottom now
3:36
there's a little trick to that we want
3:38
to have an accurate
3:40
hexagon so if we just do this we will
3:44
not keep the shape of the hexagon so
3:46
what we're going to do
3:48
is attach two opposite squares and align
3:53
them
3:54
together and once we align all the
3:57
squares together
4:00
you will see that we'll get the perfect
4:02
hexagon so when you attach the two the
4:06
first two make sure that they're aligned
4:09
that the their edges align together
4:13
straight see this is not straight you
4:15
need to move
4:16
it in order for it to
4:19
be exactly
4:25
aligned always attach two opposite
4:28
squares and if you need need to move it
4:30
a little bit move it until they're
4:31
aligned together one exactly on top of
4:35
the
4:38
other and
4:40
then see it moved a little bit so I need
4:42
to adjust make sure they're perfectly
4:45
aligned and then the last two
4:52
squares and that will give us a perfect
4:55
hexagon
5:07
okay just adjusting the
5:11
alignment okay so now you have the
5:13
perfect hexagon and you need to make two
5:16
more boxes exactly the same thing so Al
5:20
together you need three
5:22
boxes now I'm going to show you how to
5:24
make the outer box so we're going to
5:28
take the outer box piece and score it at
5:31
2 4 6 8 and
5:37
10 this is really easy every 2
5:43
in so two 4 6 8 and 10 now the outer box
5:49
has two pieces so this is the largest
5:53
one and then we're going to bring in the
5:55
smaller piece for the outer box and
5:58
score it on the short side at two and
6:02
four and we're going to attach these two
6:06
pieces to create one large
6:12
piece like this and this will be our
6:16
hexagon
6:18
box so we're going to apply
6:21
glue first Let's Fold on all the fold
6:24
lines
6:30
and then we can go ahead and attach the
6:32
two pieces together to create that one
6:35
large piece that we need to make the
6:45
box I always like to burnish my folds
6:48
with a bone
6:50
folder and I'm going to apply glue to
6:53
the right side of that little tab
6:58
there and attach the second
7:02
piece now I have a long
7:06
piece of card stock to make my box just
7:10
make sure it's
7:16
aligned
7:19
okay so now we have our out outer box
7:23
piece
7:26
ready and we're going to cover it with
7:30
the cover
7:32
papers and again here you can play with
7:36
your papers you can choose different
7:39
patterns you can use solid color
7:43
papers you can even
7:46
leave um the large piece as it is you
7:50
don't have to cover it with cover papers
7:53
but I think it really adds to its
7:57
look looks much better this way
8:05
way so it's up to you how you want your
8:09
box to
8:10
look I'm going to make it as colorful as
8:21
possible just going to finish with all
8:24
my cover
8:25
pieces this is the last one we don't
8:28
cover the last
8:29
tab because that is where we put the
8:34
glue but I'm going to cover it anyway
8:37
just to make sure that all the pieces
8:39
are covered I don't know which way I
8:41
want to attach the
8:44
sides so now we are going to attach the
8:46
boxes to the inside of our
8:50
box so we're going to put the bottom box
8:54
on the second
8:56
panel and then the middle box
9:00
on the fifth
9:02
panel and the top box on the one before
9:08
last
9:10
panel which is the seventh panel make
9:13
sure you align the bottom but leave
9:16
about 1/8 of an
9:18
inch gap between the edge of the paper
9:22
and the bottom of the
9:25
box so you apply the glue on the empty
9:28
square that that is not covered and
9:33
then you
9:36
attach the box so the second box goes to
9:40
the fourth panel not the fifth
9:48
panel and then I'm going to attach the
9:51
last
9:53
box to
9:57
the six panel
10:01
so 2 four and six that's the panels that
10:05
you need to attach the boxes to so you
10:07
have two free panels on the right side
10:10
with nothing attached to
10:13
them and now when you close the box like
10:16
this they all align together Isn't that
10:21
cool now all we need to do is make our
10:26
lid so we're going to bring in the two
10:29
pieces for the
10:32
lid so we're going to score the first
10:34
piece first the larger one and we're
10:38
going to score it at 2 and 8 2 and8 4
10:42
and 1/4 6 and 38 8 and 1/2 and 10 and
10:50
5/8 a little bit confusing but again you
10:53
have it all written in the instructions
10:56
in The Cutting guide that you can
10:57
download for free from the link in the
11:00
description under the video so you can
11:02
go ahead and grab that and then you'll
11:04
have everything written in front of you
11:06
so it will be
11:08
easier and then we're going to score on
11:11
the short side at 2
11:15
in and for the little piece we're going
11:19
to score on the long side at 2
11:22
in and then on the short side again at 2
11:27
in so again again we're doing that
11:31
because we need to attach the two pieces
11:35
together to make the lid like we did
11:38
with the
11:39
Box create one
11:41
large piece of
11:48
paper so Let's Fold on all the fold
11:55
lines I just want to make sure that I'm
11:58
using the the smallest the smallest you
12:02
can see that there are two sizes of
12:04
squares with on the paper so you're
12:07
going to need to create the tab on the
12:12
smallest on the smaller part
12:16
of the
12:19
squares and then attach the two pieces
12:25
together because the the larger Square
12:29
SES are going to
12:30
be the top of the
12:33
lid and then the smaller part the
12:36
smaller squares are going to go around
12:39
going to be the walls of the
12:41
lid and now exactly like we did with the
12:44
Box we're going to cut from The Edge to
12:47
the score
12:50
line on the longer side where the
12:54
squares are
12:56
larger okay
12:59
where there is no
13:01
Tab and we're going to do exactly the
13:04
same thing
13:06
close ply glue on the tab and close the
13:10
lid you can cover it with cover papers
13:13
if you
13:14
want I just left it like this and then
13:18
we're going to join the two opposite
13:21
squares exactly like we
13:23
did with the box to achieve a perfect
13:28
hexagon so don't forget to align the two
13:32
opposite squares to make
13:34
sure that you get that perfect
13:41
shape so it's the exact same process as
13:44
we did for the
13:49
box if you need to move it a little bit
13:52
to make sure it's
13:54
aligned go ahead and do that
13:59
I always turn it and press it against
14:02
the table to make sure it's glued
14:13
properly and now the final
14:16
pair and again we have a perfect hexagon
14:21
now this part is going to be on the top
14:23
because it's a lid so if you want you
14:26
can go ahead and cover it I've punched
14:28
two c
14:30
CES you can add stickers you can add
14:33
papers you can add whatever you want to
14:35
embellish
14:38
it and
14:42
basically make the box your
14:45
own so this is how our finished box look
14:50
like I really like how it turned
14:52
out can fit many things inside many
14:56
gifts candy jewelry whatever ever you
14:59
want now we can go ahead and make our
15:01
second version of a stepper
15:04
box and another DIY gift box so we have
15:08
two pieces you have all the measurements
15:10
in The Cutting guide that you can
15:11
download and print and it's always a
15:14
good idea to cut all your pieces of card
15:16
stock and cover papers in
15:19
advance so we need to attach these two
15:23
pieces together so I'm going to mark 2
15:26
in from the right Edge
15:30
and I'm going to put some glue on the
15:34
back side of the smaller
15:37
piece and then I'm going to align it the
15:40
small piece with the 2in mark that I
15:43
made so this way instead of a 12 in
15:47
length piece of paper we're having a 14
15:52
in piece of paper make sure it's
15:56
straight and align it perfectly
15:59
together let it dry for a few minutes
16:01
and the next thing that we're going to
16:03
do is score it we're going to score
16:06
three and
16:07
A2 at seven and 10 and a
16:13
half go twice over this part because
16:16
there are two pieces of card stock there
16:22
remember so now we're going to fold all
16:26
the folds in the same direction
16:29
towards the
16:32
inside burnish all the folds really well
16:35
with your bone folder and this is going
16:38
to be the base for our three
16:41
drawers box forgot to put some glue on
16:45
the other Edge so now make sure that you
16:48
glue the other piece properly the
16:51
smaller piece to the large piece okay so
16:54
this is how our box is going to look
16:57
next we're going to make our draw
17:00
we need to make three dwes and for that
17:03
we have three black card stock 5 and 78
17:08
by 5 and 78 squares and we're going to
17:10
score all four sides at one and a
17:16
quar okay so all sides are
17:21
scored and now we are going to bring our
17:24
scissors we're going to cut each corner
17:27
from the edge to the first fold line
17:30
only on one side of each corner so these
17:34
two corners and then these
17:38
corners and then the next step is
17:41
optional but I like to do it it's looks
17:43
much better we're just going to cut
17:47
diagonally and have that
17:51
corner look a little bit like a triangle
17:55
it gives a better finish when you glue
17:58
all the wall walls of the
18:00
drawer you don't have to do it but it
18:02
looks better and it's easier to attach
18:06
all the sides
18:08
later so I would rather do that just cut
18:12
diagonally again from the edge to the
18:15
first fold line then we need to burnish
18:18
all our folds really
18:21
well and you do the same process for all
18:24
three squares to form your three drawers
18:30
okay and now we can go ahead and add our
18:34
glue put the glue on the inside or the
18:38
back side of the little
18:41
flaps and then attach them to the wall
18:45
next to them we did that already you
18:48
know this process it's very easy way to
18:52
create a drawer or a box or a container
18:57
from card St
18:59
make sure you align everything with the
19:03
corner so you'll have 90 de on all sides
19:07
and everything will be straight next
19:10
thing is to cover the drawer with our
19:13
cover papers and again you have all the
19:16
measurements in The Cutting guide and
19:17
it's always a good idea to preut all
19:21
your pieces for the project and then you
19:23
can create with me while I do this and
19:26
not stop every time go and cut your
19:29
pieces come back and continue so I chose
19:35
different patterns for the inside of the
19:39
drawer and for the outside of the
19:42
drawer I'm using Graphic 45
19:45
papers but you can use whatever you have
19:47
in your stash that will go with the
19:50
Christmas
19:52
theme so I'm doing the inside first and
19:56
then the outside we don't need piece for
20:00
the bottom of the drawer because that is
20:04
not seen so we don't want to waste any
20:09
paper and actually one side
20:12
of the drawer is glued to the base of
20:15
the box so you might as well leave one
20:18
side uncovered but I just covered all
20:21
everything so these are our three
20:24
drawers and before we attach them to
20:30
the base of the box I want to cover that
20:35
as
20:36
well on all four sides from the inside
20:40
as well as the
20:41
outside again you can choose matching
20:45
colors to match
20:48
your other
20:50
papers for the inside I went with almost
20:54
a solid color because I have a lot of
20:57
patterns on the
21:00
so I want it to be a good
21:03
contrast and these little strips are
21:07
going to go on the inside as
21:11
well and on the outside I chose three
21:14
mat two matching
21:19
patterns that are a little bit more
21:24
busy just so I will have a little bit
21:27
more color and
21:30
pattern so it will really look nice okay
21:34
so our base is covered and now we can
21:37
attach our drawers we're going to start
21:40
from the first drawer which is going to
21:42
go on the top
21:45
left side or
21:48
panel you just choose one side of the
21:52
drawer apply your glue and then attach
21:54
it to the panel aligning it with the top
21:58
Ed
21:59
making sure that it can be closed and
22:02
that it's
22:05
straight like
22:09
this okay everything can close so it's
22:12
aligned properly the next drawer is
22:16
going to go on the second from the right
22:20
panel and on the right panel we need to
22:24
apply glue to two sides of the box
22:29
and attach it to both the right and the
22:34
second from the right panels again
22:36
aligning it with the bottom making sure
22:38
everything can be closed properly and
22:42
that it's
22:45
straight like
22:50
this okay and the third drawer goes in
22:53
the
22:54
middle second from the left panel and it
22:58
be
23:00
aligned in the center and aligned with
23:04
other two drawers so when you close it
23:07
make sure that there is the same
23:12
gap between the top drawer in the bottom
23:15
drawer and that's straight of course and
23:17
everything can be closed Isn't that cool
23:20
I love this
23:22
project and these are three
23:26
drawers all connected
23:30
so we going to let that dry for a little
23:33
bit but first I'm going to cut these
23:37
strips in
23:39
two and then attach
23:42
them to the Box this is optional it's
23:45
just a decorative strip of paper that
23:47
you can add you can add ribbons you can
23:51
add lace you can write something you can
23:53
just leave it like
23:55
that um you can just give it whatever
23:59
look you want to to give your um
24:03
box so I'm adding those strips on the
24:06
bottom and on the
24:08
top add a little bit more
24:12
embellishments but again you
24:14
can embellish it any way that you'll see
24:18
fit okay now let's make the lid the lid
24:22
we have a 6 and a/4 by 6 and a/4 square
24:26
and again we're going to score it at one
24:28
and a quarter like we did for the
24:32
drawers so all four
24:37
sides and basically we create the lid
24:41
the same way as we
24:43
created the drawers that means that we
24:47
cut on the
24:48
corner on all four corners we cut on one
24:51
side from The Edge to the fold
24:54
line and then we snip the edges of the
25:00
corner
25:05
diagonally again to make it look more
25:08
professional and have a nicer
25:11
finish to the box or to the lid in this
25:18
case and then what I like to do
25:22
before assembling the lid is to cover
25:26
part of it it's first
25:28
just burnish all our
25:32
folds because it's kind of a not very
25:36
comfortable to cover especially the top
25:38
of the lid after you glue it together so
25:41
flip it over to the other side where the
25:44
top is going to
25:46
be and cover the top of your lid
25:51
basically you see two pieces because I
25:54
kind of ran out of paper for this
25:56
pattern so I'm using leftover
26:00
um I'm using two
26:02
pieces to form one piece to cover the
26:06
surface of the lid that I need this is
26:08
actually a really good way to use
26:10
leftover paper if you have them instead
26:13
of just cutting new paper and wasting
26:17
because you can't see that it's two
26:19
pieces now can
26:20
you so I
26:23
saved on the paper front and I didn't
26:26
need to
26:29
break or cut new paper I'm just thinking
26:32
if I'm going to use these strips or not
26:34
I'm not going to use
26:36
them um the top of the lid says do not
26:39
open till December
26:41
25th by strict order of St
26:45
Nicholas this is really appropriate for
26:48
this box it was uh on the pad of paper
26:51
so I decided to use
26:53
this so I'm adding that with a little
26:56
bit of foam tape to add dimension
26:59
and now I can go ahead and assemble the
27:02
lid it will be much easier this way
27:05
instead of adding the top papers later
27:09
with the lid is already
27:12
glued so just like you did with the
27:15
drawers apply your glue to the little
27:19
flaps and align them with the sides of
27:22
the lid make sure everything is straight
27:26
90° and and then you can go ahead and
27:29
add your other cover papers for the
27:33
inside of the lid and the outside as
27:37
well so again I
27:38
[Music]
27:40
chose the same color theme and again I'm
27:43
using leftovers here because again I ran
27:46
out
27:47
of larger pieces of paper for this this
27:52
color but again it's the inside of the
27:55
lid so nobody's going to see that it's
27:58
from two pieces of paper and if it
28:00
really really bothers you that there is
28:02
this line in the going all the way in
28:06
the middle just take another piece of
28:09
paper or ribbon and cover it and it will
28:11
be like a
28:13
decorative feature on the inside of your
28:15
lid nobody would know that it's
28:18
because you are hiding two pieces of
28:22
paper so I want to close this for a
28:25
minute just to see which side of my
28:28
pattern paper is going to look nicer
28:31
going to go with a solid side solid
28:33
color side don't want it to be too
28:37
busy this is the advantage of
28:40
using double-sided card stock because
28:43
you always have two patterns to choose
28:46
from so it's like having two papers
28:48
instead of
28:52
one and also another important point
28:56
is you can make the
28:58
from just pattern card stock not black
29:01
card stock or other solid color and then
29:03
cover it with cover papers but I don't
29:05
recommend it this entire process of
29:08
covering the card stock with other
29:11
papers with other card stocks makes
29:14
everything much
29:16
stronger look at this box isn't it cute
29:19
I love this project um so like I said it
29:23
makes it a lot stronger and that's why I
29:26
always do that proc
29:28
of building the base and then covering
29:31
it you can use this box to put candy
29:35
jewelry gift cards whatever comes into
29:38
your mind I hope you really like this
29:40
project please subscribe to my channel
29:42
and don't forget to click on the little
29:44
bell icon to be notified when I upload
29:46
new
29:47
videos um I hope you really like this
29:50
video and I will see you next time
#Crafts
#Holidays & Seasonal Events
#Gifts