live_tv
Livestream Starting Soon
00
Hours
:
00
Minutes
:
00
Seconds
Up next in 10

Welcome back on my channel!
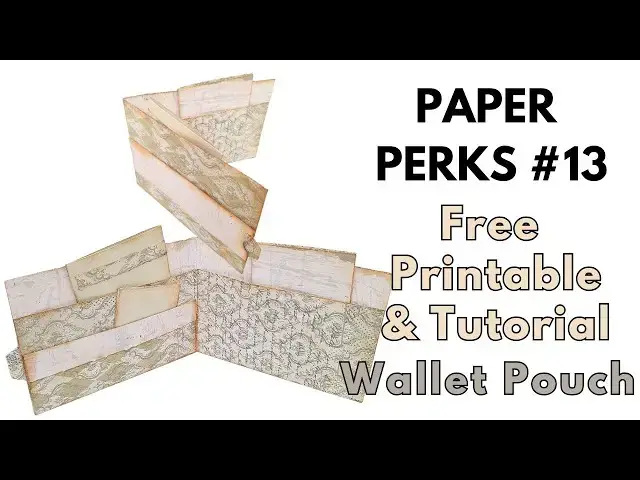
Paper Perk #13
Paper Perks are a free printables for you to download and make according to the video tutorial. #printables #printing #freeprintable #junkjournal
I really love this one!. This wallet pouch can stand on its own or be an amazing interactive insert to an junk journal.
DOWNLOAD PAPER PERKS
To download and print Paper Perk please join my Facebook group
Paper Perks
https://www.facebook.com/groups/printablepapers
The last 10 weeks of the Paper Perks are available to download.
Visit the KO-FI shop and Gallery: ko-fi.com/einatkessler
and get exclusive printables and videos.
-----------------------------------------------------------------
Join this channel to get access to monthly member perks:
https://www.youtube.com/channel/UCPdD0ifkS1vKYPs3zgDx3YQ/join
-----------------------------------------------------------------
Show More Show Less View Video Transcript
0:01
[Music]
0:10
hi everyone kler here with a new video
0:13
tutorial and today it is paper perk day
0:17
we have another paper perk for
0:21
you and this is how it looks it's a full
0:26
page paper perk it's a full page
0:29
printable
0:30
With A really lovely actually it's
0:33
upside down with a really lovely and
0:36
beautiful vintage
0:39
pattern and if you don't know what paper
0:42
perks are paper perks are a series of
0:44
printables that you can download from
0:47
the paper perk Facebook group so there
0:50
is a link for that under the video you
0:53
can go ahead click it go to the group
0:55
ask to join and
0:57
then download all the printablees
1:01
that are there including this one so
1:05
this is one side and then this is the
1:08
other side so I want to tell you a
1:09
little bit about the other side so I
1:12
have designed a basic vintage background
1:17
paper kit for you to download it has 16
1:22
different papers with a really vintage
1:26
distressed grungy look to them you can
1:30
also find them on the paper
1:33
perks um group or on my Kofi shop Kofi
1:40
is a platform you have a link for that
1:44
in the description under the video Kofi
1:46
is a platform that you can access to
1:51
support me and the channel and all the
1:55
free printables that I designed for you
1:58
and you can become a onetime
2:01
supporter or a monthly
2:05
supporter it only costs
2:08
$3 and then you will
2:11
get uh exclusive content if you become a
2:16
supporter and also you will have kits
2:19
that I upload there like this kit here
2:23
with the basic grungy background papers
2:26
like I said 16 different papers that you
2:28
can download
2:30
and you can get that for only
2:32
$3 so again go to Kofi there is a link
2:37
in the description under the video and
2:40
then you can download all the grungy
2:43
papers so I have printed one of the
2:47
papers on the other side of the free
2:50
printable so that was about Kofi now
2:53
let's make our project we're going to
2:55
make a little uh wallet pouch or
2:58
something like that
3:01
and I'm going to start
3:04
with cutting that in
3:12
half and
3:14
then I'm just going to Simply tear it in
3:18
half like
3:20
this pretty easy you can cut it if you
3:23
want with a trimmer
3:30
I'll have my distress ink
3:33
here and then what we're going to do
3:35
we're going to put this aside for a
3:37
minute and then we're going to use
3:40
this to create our pouch so you decide
3:43
if you want this part to be visible or
3:47
this part to be visible I am going to
3:50
use it like this so we're going to
3:53
fold like this
4:01
and then we're going to fold it
4:06
again so that is basically our little
4:11
wallet you can see looks pretty good and
4:14
now this part is not
4:16
white so what I'm going to do is ink the
4:20
edges a little
4:23
bit you can skip this part if
4:27
you don't want I always like to
4:31
ink all the edges with my distress
4:39
ink so it looks pretty
4:42
good and
4:44
vintaged let's do the other side as
4:55
well actually you don't need to do this
4:57
side if you want to glue it but I'm just
4:59
going to to do everything so let's bring
5:03
our
5:04
glue and then apply
5:08
glue to the edge
5:13
here to the
5:16
middle and this edge
5:19
here so we'll have our
5:26
pockets now what we're going to do with
5:29
this we're going to fold it in half
5:40
again again I'm just going to cut
5:43
it like
5:45
this and now what we're going to
5:50
do is we're going to
5:54
fold
5:56
this no sorry we're going to fold this
6:00
up to
6:06
here this
6:08
one let's do
6:10
this on the other side cuz this one is
6:14
going to go on the
6:16
front it's going to be another
6:20
pocket so this one is going to go like
6:23
this so it's going to be a bucket
6:27
here and then the other one
6:35
I'm going to fold this on the other
6:40
side so again basically what I did is I
6:44
folded this part down flipped it folded
6:50
this part and then going to fold it back
6:53
on
6:55
itself like this
7:04
so what we're going to have
7:07
is we're going to have this one goes up
7:11
here with a pocket and then maybe a
7:14
little pocket here and then on the
7:18
inside this one is not very
7:26
straight just going to make sure that it
7:29
is
7:31
straight okay so on this
7:35
side we'll have another pocket here so
7:40
let's ink everything
8:03
so I'm just inking all the
8:05
[Music]
8:08
sides and then I want to show you a
8:11
little
8:14
something okay so when you add something
8:18
to paper doesn't matter which
8:22
direction and then you close
8:25
it what happens is this part sticks out
8:29
why is it doing it
8:32
because there is more weight more
8:36
thickness to the paper here so when we
8:39
close it it pushes this paper out so
8:43
what we're going to do is just trim a
8:47
tiny little bit should have done this
8:50
before
8:53
we in it but it's okay just you know
8:57
what I'll do it with the scissors
9:00
or with a cutter it will be easier this
9:02
way so I'm just going to remove about
9:05
1116 of an
9:10
inch or
9:13
maybe just to make sure that when I
9:17
close
9:18
it it will not stick out you see that
9:22
makes all the
9:24
difference so now we can go ahead and
9:26
glue it so first we're going to glue
9:29
put glue here cuz maybe we're going to
9:33
make before
9:35
that just
9:37
want to use a whole
9:42
punch just
9:46
to
9:48
know that a tag is going to go in there
9:52
so going to put glue only on the top
9:56
here
10:01
and
10:05
here then glue it
10:09
down so we'll have a pocket on this
10:13
side and then let's turn it and this one
10:17
you can glue it all the way it's just
10:19
for decorative purposes there is no
10:21
pocket
10:23
here so we can do
10:26
this and then we're going
10:30
to add glue only on the
10:33
sides cuz these are going to be pockets
10:37
on the front and on the
10:43
inside so this
10:46
one goes on the
10:49
front and this one goes on the
10:57
inside so now
11:01
it doesn't stick out you see so
11:04
basically our wallet is finished and now
11:07
we
11:07
can have all kinds of inserts and cute
11:11
little things to put
11:16
inside so let's see how to do
11:19
that okay so now we can make the little
11:23
tag
11:26
here so I'm just going to
11:33
fold it so it will be a little bit
11:39
thicker and then cut it
11:55
out and then we can glue it I just one
11:59
wanted to have two layers so it will
12:03
be a little bit more
12:13
sturdy so
12:16
maybe two
12:19
corners like
12:22
this ink the edges a little bit you can
12:25
embellish it with anything that you want
12:28
of of
12:34
course still wet so it's not very sturdy
12:38
but it will go in here
12:43
perfectly it's make it slightly
12:50
shorter let's wait until it's dry so it
12:53
will fit but it you see how it fits
12:56
perfectly and this one
13:00
just going
13:02
to fold it in
13:07
half again you can embellish it any way
13:10
that you
13:14
want and this one can go in
13:18
here or it can go in here you can add
13:23
take a piece of
13:31
tea dyed paper actually if this is a
13:34
little bit too long then you
13:38
can cut a
13:47
strip this one can go in here this
13:52
one you
13:54
can use it as a
13:59
little
14:07
decoration just going to glue it
14:12
down make use of every piece of paper
14:16
that you
14:19
have from the
14:22
freebie and then just fold this one too
14:31
again you can add whatever you
14:44
want let's cut another
14:48
one can fold this one this can be a
14:52
really
14:53
great happy
14:55
mail can fill it with tags and
14:58
Embellishments
15:00
and then send it to
15:02
someone or it can be a really great
15:05
addition
15:15
to really great addition to your Journal
15:18
which I'm going to add
15:21
just looks like a little
15:24
notebook so that one can go in here and
15:28
you get the idea
15:29
you can add embellishments here this one
15:33
now it fits perfectly and it's
15:36
dry can add ribbon you can add whatever
15:39
you
15:41
want to it and then I'm just going to
15:45
grab my journal and add it to
15:49
it so let's grab our
15:57
Journal it's where we're going to put it
16:01
oh this is a great place just want to
16:05
Ink it a little
16:09
bit so it won't be so
16:20
white so I'm going
16:22
to put glue on the back here again you
16:26
can do can add this to a happy mail but
16:29
I'm just going to add it
16:33
here and then open it and I have
16:37
multiple pockets on the
16:42
inside Isn't that cool really hope you
16:46
like this paperbook printable for this
16:48
week go ahead to the group
16:53
and download it and don't forget to
16:56
check out the background
16:59
paper kit the new kit that I added to
17:01
Kofi again you have a link for that
17:05
again in the description under the video
17:07
also there is a link in the group to
17:10
reach the Kofi
17:13
and get that kit for only $3 or become a
17:17
supporter so thank you very much for
17:20
joining me and I will see you next time
#Online Media
#Crafts
#Photo & Video Services
#Document & Printing Services
#Photo Printing Services