live_tv
Livestream Starting Soon
00
Hours
:
00
Minutes
:
00
Seconds
Up next in 10

I will break down the steps for making a mixed media art project and teach you some simple mixed media techniques. These easy mixed media techniques can be applied to a canvas, art journal page or any other mixed media project #mixedmedia #mixedmediaart #easyart #artprocess #artsandcrafts
Join this channel to get access to perks:
https://www.youtube.com/channel/UCPdD0ifkS1vKYPs3zgDx3YQ/join
Show More Show Less View Video Transcript
0:00
hi everyone inat Kesler here with a new
0:02
video tutorial and today I'm going to
0:04
show you simple mixed media techniques
0:07
so we're going to start with priming
0:10
priming your page your art journal page
0:12
or your canvas is really important so
0:16
all the materials that you're going to
0:17
add are going to really hold on to the
0:20
surface that you're working on and you
0:23
won't get any bleeds or any smears or
0:29
the 3D elements that you're adding will
0:32
stay on and so on so you need to use
0:35
gesso to prime your
0:38
surface next we are going to add some
0:43
background and this is the base layer so
0:46
the base layer is basically the first
0:48
layer that you add to your mixed media
0:50
project it can be an arinal page or a
0:54
canvas or any other project that you're
0:56
making and it can be from anyy material
1:00
I am using old book
1:03
papers and I'm attaching them to my
1:07
canvas with gel medium you can also you
1:10
use Mod Podge these are glues that are
1:15
also um sealing the top layer of the
1:21
paper so you need to put one layer to
1:24
attach them to the surface and then
1:26
another layer on top of them to seal it
1:29
these are really gluey and
1:32
liquid materials that you can apply with
1:36
a brush so the base layer can be paint
1:40
sprays papers
1:43
fabric any type of first base that you
1:47
want to build your creation on so I'm
1:51
covering all the sides of my canvas with
1:53
the old book pages and make sure that it
1:57
is completely dry before you continue
2:00
our next technique is adding texture one
2:03
of the most common and uh required let's
2:07
say elements of mixed media projects is
2:11
texture and you can add texture in a lot
2:14
of ways I'm going to show you two ways
2:16
so I'm using a bandage this is like an
2:19
old bandage you can use cheesecloth I'm
2:22
getting this for my local pharmacy and
2:25
then I'm just fraying it a little bit
2:26
with my fingers and attaching it to the
2:31
canvas again with gel medium gel medium
2:33
or Mod Podge is a really strong glue and
2:36
it goes to all the nooks and crannies
2:38
that you need especially if you're not
2:40
working with a flat surface like now so
2:44
I'm cutting pieces of my
2:46
bandage and or my cheesecloth or any
2:49
other fabric by the way that you
2:51
want and then I'm fraying it with my
2:54
fingers and attaching it to the canvas
2:57
and you see it is completely jumbled up
3:01
and creating layers with
3:04
it and the texture will look really
3:08
pretty and
3:11
interesting so you just keep on adding
3:14
that layer until you're
3:16
happy next I'm going to use some
3:18
modeling paste modeling paste is a thick
3:22
paste that you can add and it
3:26
stays um on the surface it does not
3:31
flatten so you can use it with stencils
3:33
or you can use it with a pallette knife
3:35
like I'm doing here just to add texture
3:37
rides and height uh areas that are uh
3:42
higher than the surface and then of
3:45
course make sure that it is completely
3:48
dry before you continue with your next
3:52
technique and that is adding color
3:55
adding color can be done in millions and
3:57
millions of ways first of all you can
3:59
use any type of color that you want that
4:02
means you can use watercolor acrylic
4:04
paints oil paints crayons
4:07
markers uh colored pencils Etc and of
4:12
course you can choose whatever color
4:14
combination that you want I'm using
4:16
distress stains here distress stains are
4:20
transparent
4:22
inks and they're very liquid they come
4:25
in a bottle with a sponge and I'm using
4:27
a brush to spread them around
4:32
and then I'm also going to add some
4:34
sprays I really like using sprays it
4:37
they go into all the nooks and crannies
4:39
and create a really beautiful color
4:42
effect when you add them so you see now
4:46
when I add color when I add the stains
4:50
onto the texture it really makes the
4:53
texture pop pop out because some areas
4:57
are higher than the others and the paint
5:00
goes inside the the the little nooks and
5:05
crannies and makes it look really pretty
5:08
so I also sprayed the canvas and then
5:10
made sure everything is completely
5:14
dry and now I can go ahead and continue
5:19
with
5:20
adding my text and my focal point
5:23
usually at this point you add your focal
5:26
point before you add all the other
5:29
details and text but I just wanted to do
5:33
that
5:34
first to make sure
5:38
that so that I have my letters in the
5:40
right place
5:43
and what I'm doing is I'm using
5:46
chipboard letters and I'm just
5:48
adding some distress stains to color
5:52
them and also I'm coloring them with PCA
5:58
pens which which are really great to use
6:00
almost on any surface these are type of
6:04
acrylic paint
6:06
markers that I really like using so I'm
6:09
just going to color all my letters I'm
6:11
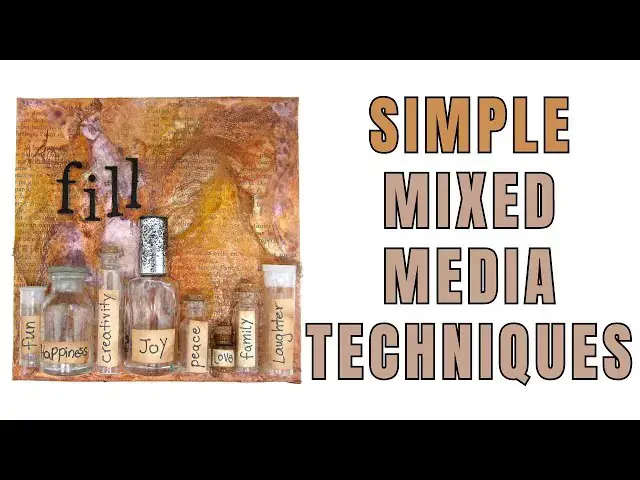
going to spell the word
6:13
fill because my focal point is going to
6:17
be connected to that word so next I'm
6:22
just going to add my text to the canvas
6:27
and when you make a mixed media project
6:29
you don't necessarily have to add text I
6:32
like to add
6:34
words to my projects but that is a
6:37
personal choice that you don't have
6:41
to
6:45
make so once I have all my letters I can
6:48
go ahead and add my focal point so my
6:50
focal points is a bunch of
6:54
old little bottles and and vials
6:59
that I am going to add little words on
7:04
them
7:07
and like joy and love and things like
7:11
that and words like that so basically
7:14
I'm going to fill my life with in the
7:18
bottles with all the words that are
7:20
going to be on the bottles so I'm just
7:22
using the same old book paper to spell
7:27
the words and attach them
7:31
to the
7:36
bottles I even have a a small perfume
7:39
bottle here an empty
7:41
one you can get those in all the little
7:46
bottles and glass bottles and vials can
7:48
be found in craft
7:54
stores you can actually use plastic ones
7:57
as well doesn't matter as long as
8:00
they're transparent and then you can
8:03
add you can also fill them with little
8:07
beads different colors I didn't do that
8:10
but you can do that as well that will
8:12
add extra interest and texture to your
8:15
piece so I'm using a really strong glue
8:18
E6000 is an industrial strength glue
8:23
because the bottles made are made of
8:25
glass they're kind of
8:27
heavy and when I H this on my wall I
8:30
want to make sure that they don't fall
8:33
so I have to use a really strong
8:36
glue don't use
8:40
um just uh hot glue or any other type of
8:44
glue it needs to be really really strong
8:47
glue so this is how my final piece looks
8:50
I really hope you liked it and that
8:52
you'll give all those mixed media
8:54
techniques a try thank you very much for
8:56
joining me please don't forget to
8:58
subscribe to my channel and click on the
8:59
little bell icon to be notified when I
9:01
upload a new video so you won't miss
9:03
anything you'll be able to follow all
9:05
the tutorials and make all the projects
9:08
thank you very much for joining me and I
9:10
will see you next
9:28
time for
#Arts & Entertainment
#Visual Art & Design
#Painting