November 24th, 2010
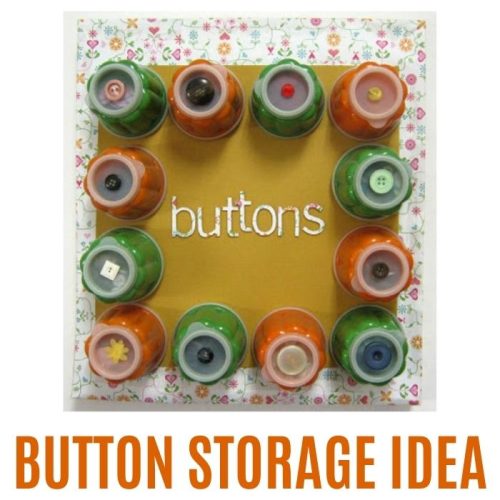
Inside: how to make a fun DIY button storage idea I have too many buttons! My storage for them was too small and I had to find a solution…fast. I knew I wanted to organize my buttons by color in small containers, but I wanted all the containers to be in one place and be close to me, so I can reach for them whenever I need a button or two. I also wanted to use an empty space on the wall above my desk that I could easily reach. Finally came up with the idea to create a magnetic surface and attach containers to it and hang it on the wall. MAKING A BUTTON STORAGE IDEA I always try to make my own storage solutions from stuff I have around the house so I can reuse them. This way I reuse what I already have instead of throwing it away. If don’t …
I know it’s not the beginning of the year, but I love this layout I did when my oldest son started school (about 5 years ago) and I didn’t have a chance to post it on my blog until now.. This day was very special, it wasn’t just a first day of school; it was the first day of the first year in school with a new classroom, a new teacher and new friends. He was very excited and so was I; he didn’t cooperate with the camera so I only managed a few photos. For this layout I decided to use a book, as if this is part of a story. I cut the photos to fit the pages in the book and arranged the letters as if they were falling of the book. It is so amazing to watch how he has grown and learned new things. I am a very proud mother!
I made this Mini Album for a workshop I taught in “My Punch”. I wanted to teach a specific design style and since vintage is one of my favorites I decided to make a mini album full of fun embellishments and techniques. The mini album is made from 1 craft cardstock, 5 patterned papers and a few embellishments. I made most of the embellishments myself, as well as the cover, which was made from pieces of cardboard I took from a shoe box. The theme of the mini album is “Time goes by”. I used old photos of my mother and grandmother, as well as a few photos of me and my sister as little girls. For the final touch, I added a few sentiments and quotes about time and its meaning in our lives. Here are a few close-ups of the embellishments. Soon I’ll post a few tutorials! stay tuned!