Home » BLOG » HOW TO TRANSFER A PHOTO TO PAPER QUICKLY
HOW TO TRANSFER A PHOTO TO PAPER QUICKLY
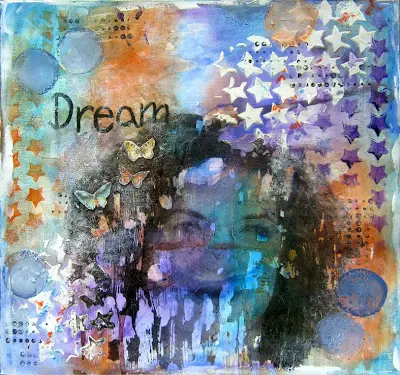
Inside: how to transfer a photo to paper
I cherish all the photos I take but making scrapbooks and mini albums can sometimes be boring. So I try to find new ways to make craft projects with photos or combine them with what I create.
HOW TO TRANSFER A PHOTO
Photo transfers were once a complicated, sometimes hazardous process. Then, technology made it possible for anyone to scan, copy, and print photos from the comfort of their home or studio. Images printed on inkjet printers are much safer to use and easier to transfer. There are many image transfer methods and they differ depending on the surface you’re transferring the image to.
TRANSFER A PHOTO TO PAPER METHODS
There are two methods to transfer an image to paper:
LASER PRINTED PHOTO
TRIM THE PHOTO – you can cut around the photo in a rectangle or square shape or you can fussy cut the photo.
APPLY PHOTO TO PAPER – apply a good amount of gel medium to your page or paper. You need a smooth and even coat on the paper so that all areas of the image will adhere at the same speed. Quickly lay the image face down into the wet medium. Smooth with your fingers and then burnish with a edge of a scraper or old credit card.
REMOVE IMAGE TRANSFER BACKING PAPER – wait 2 minutes. Then slowly lift a corner or an edge. If you see any of the image sticking to the backing paper, lay it back down and burnish it. When you see no part of the image sticking to the backing paper, begin to pull on a diagonal across the image. Once all the big pieces of paper are removed, begin to gently rub the surface with your finger.
INKJET PRINTED PHOTO
Print the photo on a printer transparency. Print it on the rough side.
Apply gel medium to the paper and lay the transparency on the paper rough side facing down.
Rub the transparency with your fingers and then with a bone folder or a plastic card.
Pull transparency to check if the photo is attached to the paper. If so continue to remove transparency, if not rub some more.
Here’s the step by step video that show how to transfer a photo to paper and create an art journal page with this technique.
SUPPLIES FOR MAKING THE ART JOURNAL PAGE
Need more art journal page ideas? Check out the 30 Art Journal Page Ideas eBook complete with step by step tutorials for 30 amazing pages, tips and tricks and easy art journaling techniques every crafte should know!
Sharing is caring – PIN IT!
Have fun creating!
13 Responses
For the inkjet method, can you reuse the transparency, or does it create a ghost image of the previous printed image? That could be interesting, too.
Sign up for a crafty creative newsletter. Tips, inspiration, updates, exclusive sales and much more!
Tags
Copyright
The designs, pictures and instructions listed on this blog are provided here for personal use only and may not be sold, reproduced or used for commercial or submission purposes in any form without my written permission.
Welcome to the new and fresh website!
Hi visitors and members, we updated the website with a new design.
All members still have access to the content you had previously.
If you have any questions or issues please contact me by email: kessler054@gmail.com


13 Responses
For the inkjet method, can you reuse the transparency, or does it create a ghost image of the previous printed image? That could be interesting, too.
I haven’t tried reusing it. There is no ghost print, but there might be some ink leftovers that can affect the printer. You should try and let us know
Thank you for the easy to follow instructions on both the gelato crayons and the photo transfer!!
Einat, did you collage and paint over the photo transfer and before you applied the photo transfer?
No I did everything before
What is the product name of the transparency you used.
I don’t know the name – I bought it at a local craft store in units so there was no package
Is it transparency film ? Thank you.
No It’s a transparency for a printer
I really like this process. I will be trying this technique. It’s nice. See how well it comes out using an ink jet printer. Thank you
I’m sure you’ll create something beautiful!
Einat, have you used a laser print or an inkjet print for your image? I love this effect!
I used an inkjet printer