New Year resolutions – Tutorial

I want to share with you a project I did for the Jewish New Year back in September. I always decide a lot of things in the beginning of the year, but then they seem to fade as time goes by. So this year I decided to keep all my resolutions close to me, so I will be reminded of them all the time. Here is how you do it: 1. You take an empty gum box and cover it with paper. Don’t cover all of it with one piece of paper, because it will be very hard to fold. Measure the different sections of the box and cover them with separate pieces. Make sure to leave the folds uncovered. 2. To cover the wavy front trace the line with a pencil and cut accordingly. 3. Make a cut on the front of the box so it will be possible to close it by tucking the flap in it. 4. …

Technique Corner

Whenever I use a fun technique I like to share it with all of you. So I decided to start “Technique Corner” which will be THE place to find easy, fun and quick techniques. This way, each time you’ll see the title “Technique Corner” you’ll know there is fun to be learned and new things to try. I did this layout for My Punch’s kit of the month club. This is a layout with a photo of my son when he was 1 month old. I wanted to give this layout an atmosphere of a magical peaceful night. I added the moon with the hat and instead of just adding stars; I hanged them on a string. As if they were hanging from the sky, twinkling and shining. Here’s how you can do it:1. Cut or punch stars. 2. Arrange the stars on the paper. 3. Take a piece of string, yarn or twine and put it on the paper …

Sizzix Triple Play Blog Hop, week 7: Christmas Countdown

Hello my friends, we have reached our final week in the blog hop. I’m so sorry it’s over; I had so much fun making all these wonderful projects. Thus week is no different, Eileen Hull designed a bunch of Treat Bag Toppers and we got to play with them! I wanted to create something different and not use them as toppers for a treat bag. Their shape reminded me of those standing calendars you put on your desk, so I decided to design a Christmas countdown calendar. I covered all the larger shapes with paper and colored the smaller shapes with colored pencil. I made small pages counting down to Christmas and attached them to the topper. I added the title to one of the shapes and embellished it. I adhered the shapes to a wire and inserted it through the fold line, securing them on the back with sticky tape. I hope you enjoyed the blog hop as much …

Sizzix Triple Play Blog Hop, week 6: YOU Mini Album (Tutorial)

Week 6 of the Blog Hop is here! I can’t believe 6 weeks have already passed and the hop is almost over. I love mini albums, so I was very excited to play around with Brenda Pinnick’s Album, Brackets XL Die. I got paper and canvas pieces which made it even more fun. What made my happy feeling complete was the fact that the idea I had for the mini album solved a problem for me. When I put photos of my kids in my purse they always get lost and if I put them in a mini album it doesn’t stay whole for a long time because of all the stuff I have in the purse. This mini is perfect for that because it has a bag of its own! I took the two large canvas pieces, sewed them together and made a little special bag to put my mini album in. then I made the pages of the …

Happy Hanukkah – Paper Candles Tutorial

Today is the first day of Hanukkah and we light one candle. I made this layout with a few Hanukkah photos from last year for My Punch November kit. I used a cool technique to create the 3D candles. Here is how it’s done: • Cut 3″ X 2″ rectangular pieces from patterned paper. • Roll up each piece of paper and adhere the edge. • Cut flame. Embellish with stickles, ink or paint. • Attach the flame to the candle by adhering it to the inside of the roll with a piece of 3D foam tape. Embellish your Hanukkah, Christmas or any other layout with these beautiful cool candles. Tune in tomorrow for the Sizzix Triple Blog Hop with a fun project. Einat

HOW TO MAKE A FUN DIY BUTTON STORAGE IDEA

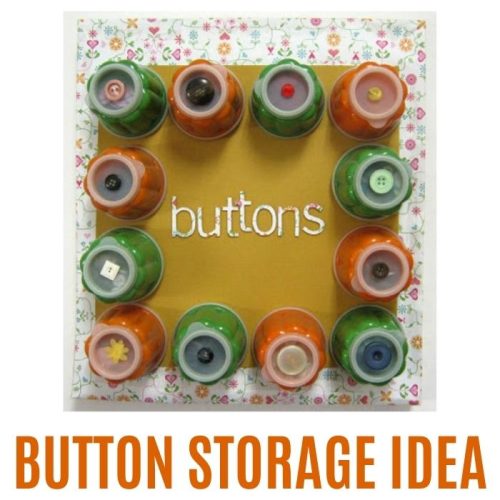
  Inside: how to make a fun DIY button storage idea   I have too many buttons! My storage for them was too small and I had to find a solution…fast. I knew I wanted to organize my buttons by color in small containers, but I wanted all the containers to be in one place and be close to me, so I can reach for them whenever I need a button or two. I also wanted to use an empty space on the wall above my desk that I could easily reach.       Finally came up with the idea to create a magnetic surface and attach containers to it and hang it on the wall.   MAKING A BUTTON STORAGE IDEA   I always try to make my own storage solutions from stuff I have around the house so I can reuse them. This way I reuse what I already have instead of throwing it away. If don’t …

First day of school

I know it’s not the beginning of the year, but I love this layout I did when my oldest son started school (about 5 years ago) and I didn’t have a chance to post it on my blog until now.. This day was very special, it wasn’t just a first day of school; it was the first day of the first year in school with a new classroom, a new teacher and new friends. He was very excited and so was I; he didn’t cooperate with the camera so I only managed a few photos. For this layout I decided to use a book, as if this is part of a story. I cut the photos to fit the pages in the book and arranged the letters as if they were falling of the book. It is so amazing to watch how he has grown and learned new things. I am a very proud mother!

1 2 3 4

Einat Kessler

Welcome!


Hello crafty friends!
I'm Einat: creative professional,mixed media artist, scrapbook and paper designer, altering enthusiast and class instructor.
Click here to learn more about me and my creative journey

Contact me:
kessler054@gmail.com


Social Links


Newsletter Signup


Craft and Hobby Association


Copyright Information

Copyright


The designs, pictures and instructions listed on this blog are provided here for personal use only and may not be sold, reproduced or used for commercial or submission purposes in any form without my written permission.


Blog Archive