June 29th, 2013
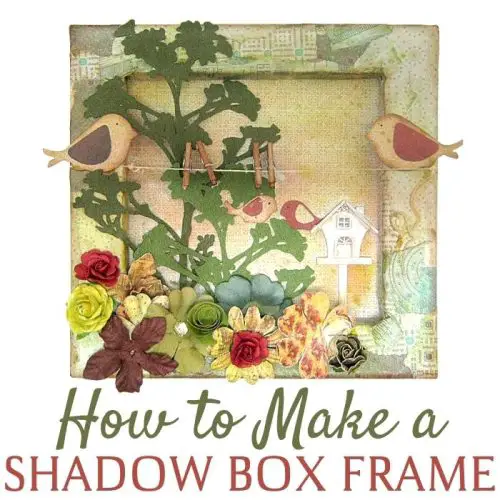
Inside: how to make a shadow box frame I was 50 years old just a few months ago and I’d like to think my memory is as good as it was 20 years ago, but I’ll have to face reality…it’s not! I have to write everything down or I’ll forget it. So i write notes and I put them in my DIY shadow frame box that is also a bulletin board. MAKE A SHADOW BOX FRAME BULLETIN BOARD If you are used to looking at a canvas as a flat surface to make art on, you better think again! A canvas has two sides… One is flat and great for art and mixed media projects, but the other side is much more intereating. The other side of a canvas is like a shade box frame waiting to be made. Since it has depth it is perfect for turning it into a shadow box. There are …
November 19th, 2012
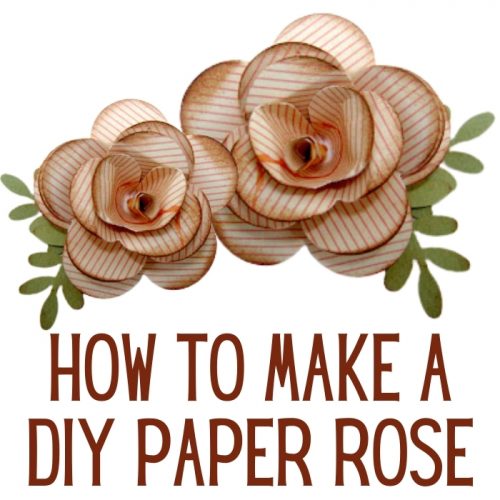
Inside: how to make a DIY paper rose flower for paper crafts When I need a specific embellishment and I can’t find it in my stash I make one this way I always have the perfect embellishment that matches my project in color and size. This is also a great way to use my paper scraps instead of throwing them away. This DIY paper rose technique require the following: 6 petals flower punch Double sided cardstock Leaf punch (optional) Here are three different size punches you can use to make this flower: HOW TO MAKE A DIY PAPER ROSE STEP 1 Punch 3 flowers. If you don’t have the right punch you can print a flower image on the computer, cut it and trace it on your cardstock. Left flower: make a cut from the edge between two petals to the center. Middle flower: cut out one …
June 12th, 2012
You know I love creating project from only one sheet of paper! Here is another fun and easy tutorial for The Robin’s Nest DT. This is a great way to create a project without using too many materials or money. All you need is: one sheet of cardstock, two ribbons and a few embellishments! You can visit The Robin’s Nest blog and website 1. Fold a double sided cardstock in four. Open all folds. 2. Start working on the upper right square. Cut the cardstock on the vertical fold line from the edge to the center. Widen the cut a little bit. 3. Cut the cardstock on the horizontal fold line half way from the center towards the right. 4. Fold the upper right square in half to the right. 5. Cut the cardstock on the new fold line from the center half way to the top. 6. Fold upward. 7. Fold again to the right. 8. Fold downward on …
February 1st, 2012
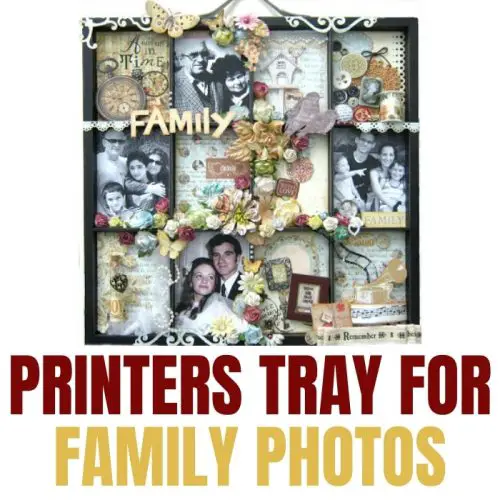
Inside: how to make printers tray for family photos I was lucky to have grandparents until I was in my fourties. When we celebrated my grandmother’s 80th birthday I wanted o make somehing special for her. I made her a printers tray displaying treasured family photos of three generations of her family. WHAT IS A PRINTERS TRAY A printers tray or letterpress drawer is a thin wooden tray with compartments. These drawers were part of a larger printing cabinet that were common between the 15th and 19th centuries. The small sections store letter stamps or “sorts” that were used in a printing press for printing. Letterpress drawers are also referred to as type cases, type drawers and printer block drawers. HOW AND WHERE TO GET LETTERPRESS DRAWER Some people are lucky enough to find a tray or an entire cabinet in their attic, but this is a much less common occurrence since the …
September 23rd, 2011
Inside: how to make your own button tree embellishment When I sit down to create a page I usually have an idea and when I start working this idea takes shape. My idea for this photo was to create a scene around the photo. Since the boys were pointing at something in the distant view I wanted to complete the story by creating a near view of where they were standing. HOW TO MAKE A SCENE Making a scene is basically adding embellishments to complete a vision of a scene or a place. So instead of embellish a page with abstract or cluster embellishments you actually create a scene like you would in a painting. The scene for this photo is a path with flowers and a tree shading the two boys. MAKING A BUTTON TREE One of my favorite things to do when I create a scrapbook page is to …
May 30th, 2011
Inside: how to make a DIY spiral paper flower for scrapbook pages, cards and paper crafts How many times did you need an embellishment for a project you were working on but didn’t have what you wanted? It was the wrong size, the wrong color or the wrong shape… there is nothing more annoying to stop working on a project because you don’t have what you need to finish it! I never find myself in this situation because I make my own embellishments! I started doing that when I started scrapbooking because when I started there was simply nothing to use. The scrapbooking industry didn’t exist here and I could buy any papers or embellishments even if I wanted to… so I had to make what I needed. Since then it became kind of a personal challenge to be self sufficient when it comes to embellishments and I try to buy as little as I can …
November 24th, 2010
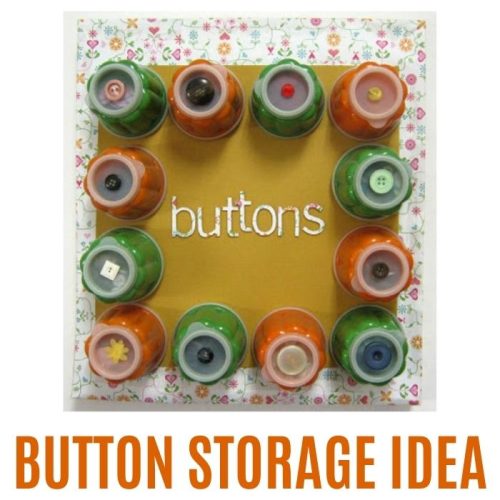
Inside: how to make a fun DIY button storage idea I have too many buttons! My storage for them was too small and I had to find a solution…fast. I knew I wanted to organize my buttons by color in small containers, but I wanted all the containers to be in one place and be close to me, so I can reach for them whenever I need a button or two. I also wanted to use an empty space on the wall above my desk that I could easily reach. Finally came up with the idea to create a magnetic surface and attach containers to it and hang it on the wall. MAKING A BUTTON STORAGE IDEA I always try to make my own storage solutions from stuff I have around the house so I can reuse them. This way I reuse what I already have instead of throwing it away. If don’t …
« Previous
1
…
27
28
29
30
Next »