June 9th, 2015
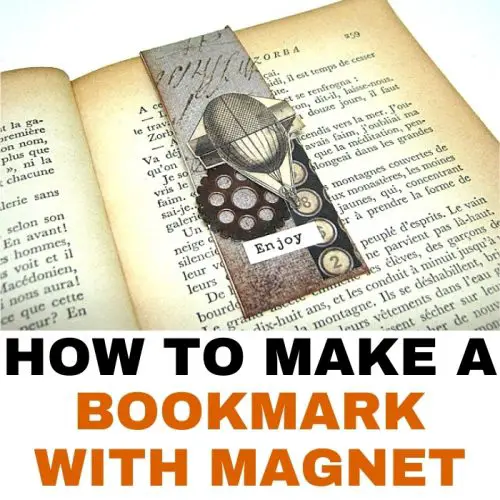
Inside: how to make a DIY paper bookmark with a magnet When I was about 8 or 9 years old I used to read a lot of books, so many that I had a special position in the library. I was selected to be a special helper to the librarian and as part of my job I arranged books on shelves and mended torn books with masking tape – I guess I had good hands even back then  That job made me feel so important and accomplished and I think it was one of the most positive experiences I had as a child. Today I don’t read so much but books have a special place in my hearts. I could never read a book on Kindle or on the computer and if I do read a book its always a hard copy. If there is one thing I hate is that people mark their …
December 7th, 2014
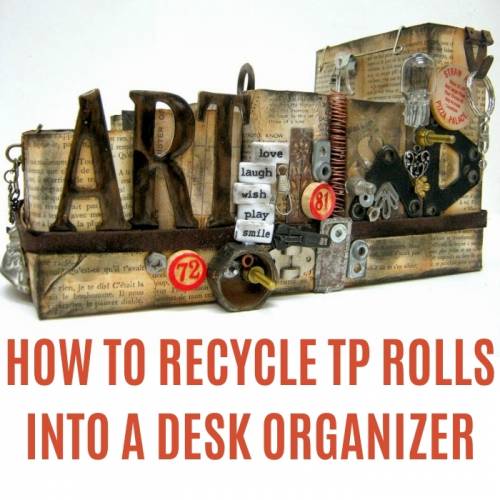
Inside: how to recycle tp rolls and empty cardboard boxes into a desk organizer I was recently asked by a fellow crafter to complete the sentence: “you know you are a crafter when: ___”. Well the answer for me was easy… when everything I see I immediately think how I can make it into something else and what kind of craft project I can make of it. This was true when I had to throw some tp rolls and empty cardboard boxes last week and I thought why don’t I make something out of them instead of throwing them away. So it happened I was in need of a new and improved desk organizer… RECYCLE TP ROLLS AND CARDBOARD BOXES When you’re a crafter and you care about the environment throwing away tp rolls and food packages seem like a terrible waste. That’s why recycling has become so popular and one person’s trash is another …
August 30th, 2014
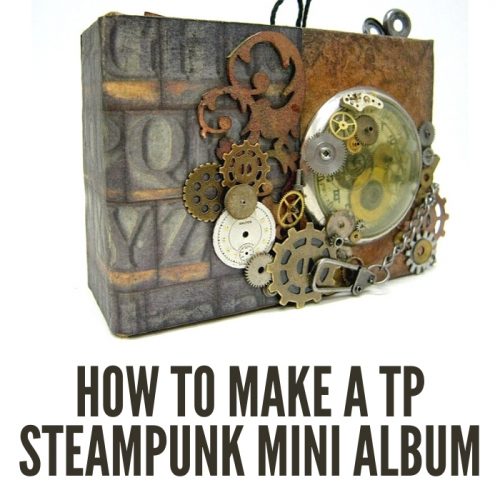
Inside: how to make the tp steampunk mini album pages WOW!! I got so many amazing responses. Thank you! I’m so happy you liked this mini album as much as I did. Wasn’t it really fun and easy to make? Well…after much anticipation here comes the second part…THE PAGES! We’ll venture into these beautiful pages and learn how to create them one by one! Let’s get started! TP STEAMPUNK MINI ALBUM PAGES The TP rolls are perfect for creating pockets so they are perfect as pages in an interactive mini album. To enhance the steampunk look instead of covering the tp rolls with paper or paint I gave them a faux leather look with a fun technique. This album is full of interactive surprises. Pockets, flaps and more… as well as handmade embellishments that will take your breath away. Some of the work is delicate and requires patience but believe me, it’s …
August 23rd, 2014
Inside: how to make a tp steampunk mini album with pocket pages Do you ever see an object and think “what can I make out of it”? It happens to me all the time and I think it’s a common crafter’s point of view. For sometime now I keep looking at tp rolls and think what a shame to throw these away… there must be something I can do with them… TP STEAMPUNK MINI ALBUM As the title say this recycled project has three elements: Recycling TP rolls and using them for crafts. Making a steampunk project with an industrial look embellishments. Building an interactive mini album with pockets. TP ROLL CRAFTS TP roll crafts are very popular for a number of reasons: They are free! There is always a fresh suppy. Tp rolls are flexible on one hand but still thick enough like cardstock. Their color is neutral. It’s easy to paint …
October 19th, 2013
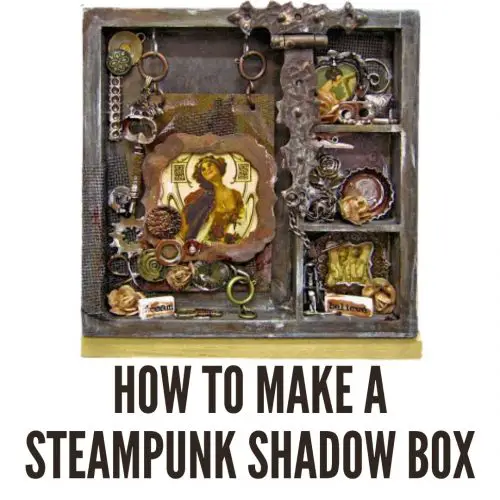
Inside: how to make a steampunk shadow box with a romantic style to it I think shadow boxes are just magical. They combine two things I love, the first is boxes. I love them, I collect them, I buy them even if I don’t need them. You can put all your treasures, memories and secrets in a box. The second thing is touching. One of the reasons I love traditional scrapbooking and not digital is you can feel the page. You can touch it, go over all the elements with your hand and bond with them. Bond with the story. Shadow boxes are the same because you can touch everything in the box and feel the story. WHAT MAKES A STEAMPUNK SHADOW BOX UNIQUE There are many styles of shadow box you can make like you would scrapbook pages, cards or mixed meia canvases. A steampunk shadow box has an industrial mechanical look that is …
September 10th, 2013
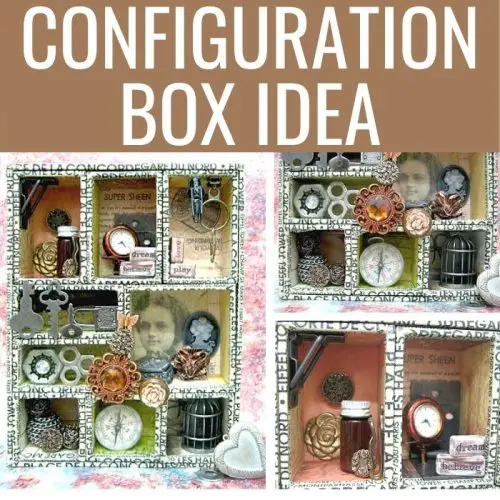
Inside: how to make a configuration box with 3D objects and little found treasures I have a confession to make… I’m a hoarder. My house is not full of stuff but I do have A LOT of metal embellishments that I collect from all kinds of places. Why I collect them is a good question – something about metal objects fascinates me especially when it comes to add them to mixed media and altered project. They have a really interesting look in a craft project that I can’t resist. However collecting is nice but what do you do with all the metal embellishments you have? I found an answer… fill a configuration box! WHAT IS A CONFIGURATION BOX Configuration box is of a shadow box with compartments that can be filled with 3D objects. You can find wooden boxes ad chipboard boxes from various brands. Each brand has a different order and sizes for …
« Previous
1
2